
Adjusting the camera settings on your iPhone can greatly improve the quality of your photos and provide more creative control. Here’s how to navigate and customize these settings to take your iPhone photography to the next level.
Tailoring the camera settings on your iPhone can transform the quality of your photos. Let’s explore how to access and make the most of these settings to enhance your mobile photography.
Opening the Camera App and Exploring Modes
The iPhone’s Camera app is designed to be user-friendly, offering a range of modes and settings for different photography scenarios.
Accessing the Camera App
- From the Lock Screen: Swipe left on the lock screen to quickly open the Camera app.
- From the Home Screen: Locate and tap the Camera icon to start taking photos or videos.
- Via Control Center: On the iPhone X and later, swipe down from the top-right corner to access Control Center and tap the Camera icon.
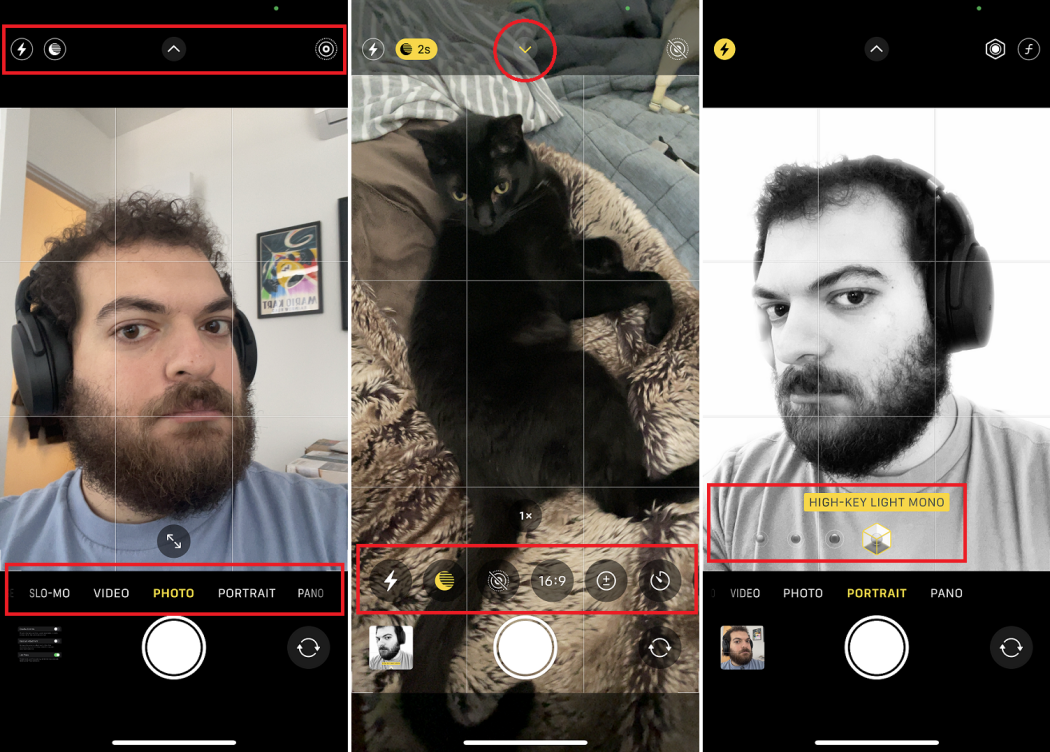
Understanding Different Shooting Modes
- Photo Mode: The default mode for taking still images. Here you can capture HDR photos and Live Photos.
- Video Mode: Switch to this mode to record videos. You can adjust the video resolution and frame rate in the Settings app under ‘Camera.’
- Portrait Mode: Available on iPhones with dual cameras, this mode allows you to take photos with a blurred background, emphasizing the subject.
- Pano Mode: Use this setting to capture panoramic images by moving your iPhone steadily across the scene.
- Slow-Mo and Time-Lapse: These modes are for capturing slow-motion videos and time-lapse videos, respectively.
Customizing Basic Camera Settings
Some basic adjustments can make a significant difference in the outcome of your photos.
Adjusting Exposure and Focus
- Tap to Set Focus and Exposure: Touch the screen where you want to set the focus, and the camera will also automatically adjust the exposure for that area.
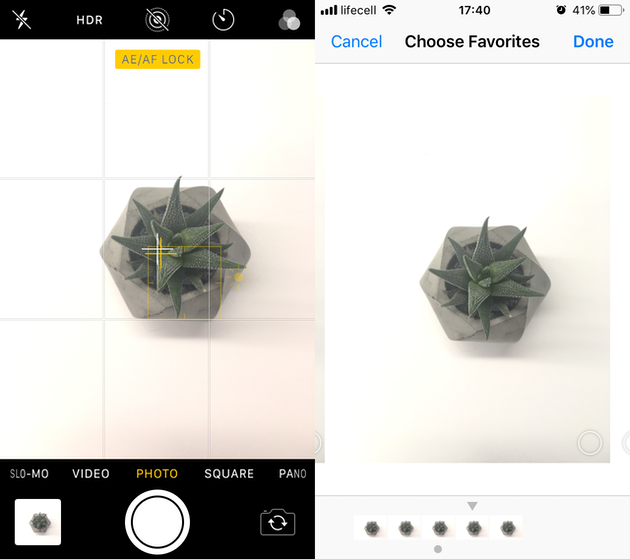
- Lock Focus and Exposure: Press and hold on the screen until ‘AE/AF Lock’ appears to lock focus and exposure settings, even if you or the subject moves.
Configuring Camera Settings
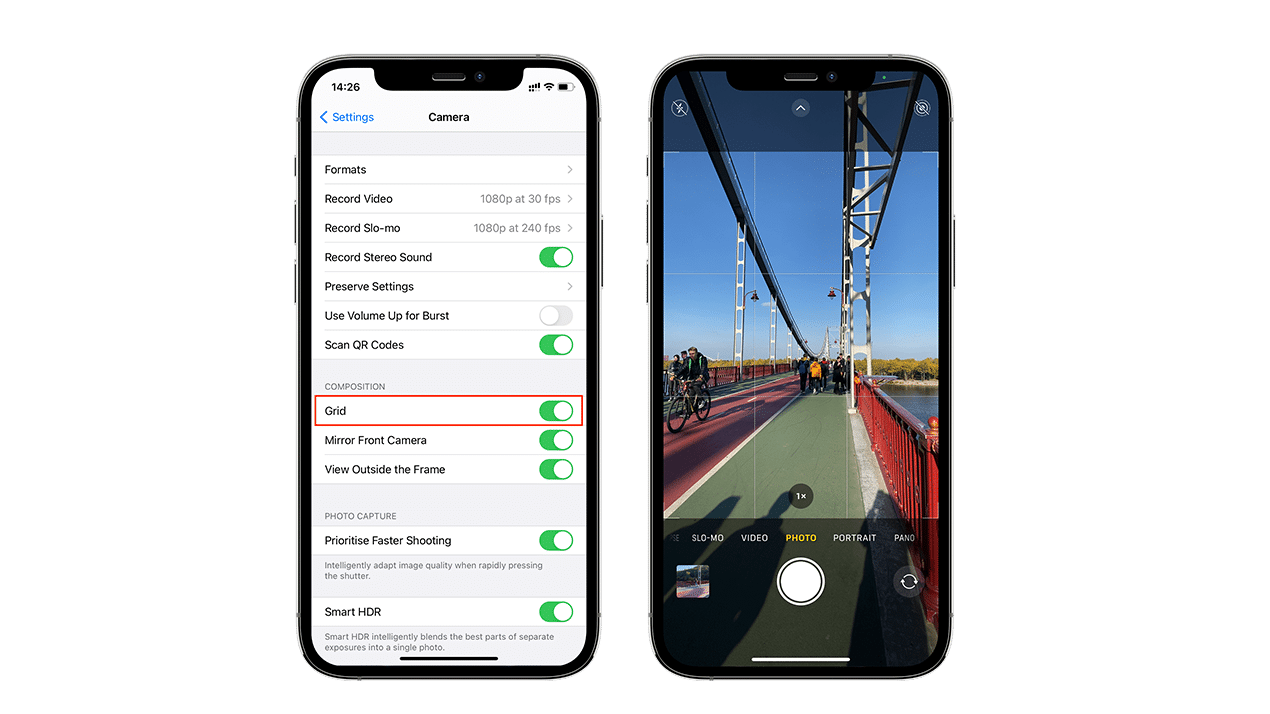
- Enabling Grid Lines: Go to the Settings app, tap on ‘Camera,’ and switch on the ‘Grid’ option to help with aligning your shots based on the rule of thirds.
- Formats and HDR: In the Camera settings, you can also choose different capture formats and enable or disable Smart HDR or Auto HDR depending on your model.
Taking Advantage of Advanced Camera Features
For more control over your photography, delve into the advanced settings available on newer iPhone models.
Using Burst Mode
- Capturing Multiple Shots: Hold down the shutter button (or the volume up button) to take rapid succession photos, which is great for action shots.
Controlling Depth of Field in Portrait Mode
- Adjusting Bokeh Effect: After taking a photo in Portrait Mode, use the depth control slider to adjust the level of background blur to your liking.
Conclusion
Accessing and understanding your iPhone’s camera settings opens up a world of photographic possibilities. Take the time to explore and experiment with the different modes and settings to discover what works best for the images you wish to create. Whether you’re a seasoned photographer or just starting, mastering these settings can significantly enhance the quality and creativity of your mobile photography.
Adjusting Basic Camera Settings
Before diving into more advanced features, learn how to adjust the basic camera settings to improve your photos immediately.
Adjusting Exposure
- Tap to Focus: Tap on the part of the image you want to focus on; this will also set the exposure for that area.
- Manual Exposure Adjustment: After tapping to focus, swipe up or down beside the focus box to increase or decrease the exposure, making the image brighter or darker.
Enabling Grid Lines
- Thirds Rule: Go to Settings > Camera and toggle on the ‘Grid’ option to enable grid lines that help in composing your shots according to the rule of thirds for a balanced composition.
Unlocking the Power of Your iPhone’s Advanced Camera Features
The iPhone’s camera boasts an array of advanced features that can help you capture stunning images that rival those taken with professional cameras.
Mastering Portrait Mode
Portrait Mode on iPhones with dual cameras or better allows you to take photos with beautifully blurred backgrounds, which can make your subject stand out.
Depth Control and Lighting Effects
- Adjusting Bokeh: After taking a photo in Portrait Mode, you can adjust the background blur using the depth control slider in the edit section.
- Portrait Lighting: Some iPhone models offer Portrait Lighting options that mimic professional studio lighting and can be adjusted for effect intensity.
High Dynamic Range (HDR) and Smart HDR
HDR helps balance the highlights and shadows in your photos, ensuring that no part of your image is too bright or too dark.
Using HDR on Compatible iPhones
- Auto HDR: Newer iPhones automatically enable HDR when needed. You can turn this feature on or off in the Camera settings.
- Smart HDR: This feature intelligently blends the best parts of separate exposures into a single photo for a more natural-looking image.
Night Mode for Low-Light Photography
Night Mode is a game-changer for shooting in low-light conditions, allowing you to capture clear and detailed images even at night.
Making the Most of Night Mode
- Automatic Activation: Night Mode automatically activates when the camera detects low-light conditions.
- Manual Adjustment: You can manually adjust the exposure time by tapping the Night Mode icon when it appears and using the slider to extend or reduce the capture time.
Capturing Action with Burst Mode
Burst Mode allows you to take multiple shots in rapid succession, which is perfect for capturing action shots or fleeting moments.
How to Use Burst Mode
- Activating Burst Mode: Simply press and hold the shutter button (or the volume up button) to start taking bursts of photos.
- Selecting the Best Shot: Once you’ve captured a burst of images, you can select the best photo from the series and discard the rest.
Creating Time-Lapse and Slow-Motion Videos
Your iPhone can capture the passage of time in a dramatic fashion with Time-Lapse, or slow down the action with Slo-Mo.
Shooting Time-Lapse and Slo-Mo
- Time-Lapse: Set up your iPhone on a stable surface or tripod, swipe to Time-Lapse mode, and tap the record button. The iPhone will capture frames at intervals and stitch them together into a fast-forward video.
- Slo-Mo: Switch to Slo-Mo mode to record video at a high frame rate, which can be played back in slow motion for dramatic effect.

Conclusion
Changing camera settings on your iPhone can elevate the quality of your photography, giving you more creative control over the images you capture. From adjusting exposure to leveraging advanced features like HDR and Portrait mode, the iPhone’s Camera app provides a suite of tools to help both novice and seasoned photographers take stunning photos.