The camera timer on the iPhone allows you to delay the shutter release, giving you time to join the frame or stabilize the camera for a clear shot. Here’s how you can take advantage of this feature.
Step-by-Step Guide to Setting Up the Camera Timer
To set up the camera timer, you’ll need to navigate your camera’s or smartphone’s interface to access this feature.
Accessing the Timer Setting
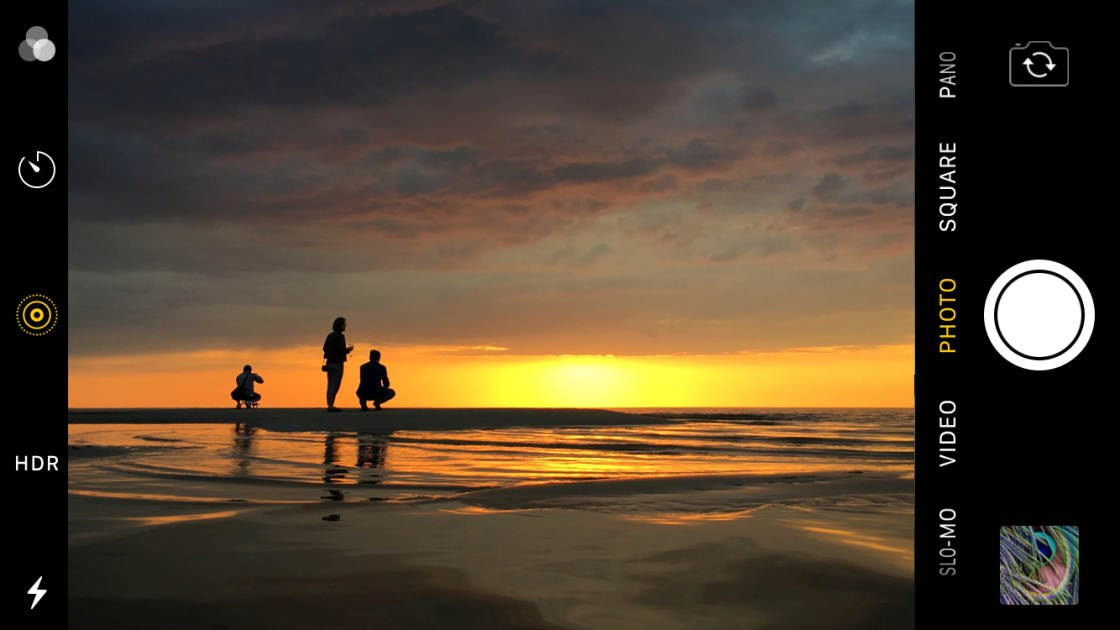
- Turn on your camera or smartphone and open the Camera app if you’re using a phone.
- Look for the timer icon, which is usually represented by a clock or stopwatch symbol. On smartphones, this icon is typically found on the screen where you frame your photo. On standalone cameras, you might need to access the menu or a specific button that controls the timer function.
Selecting the Timer Delay
- Tap or select the timer icon to see the available delay options for the timer. Many cameras offer a range of delays, such as 2 seconds, 5 seconds, 10 seconds, or even longer.
- Choose the delay that suits your needs. A shorter delay like 2 or 5 seconds is ideal for reducing camera shake when taking a photo without touching the camera. A longer delay like 10 seconds gives you time to get into the shot yourself.
Positioning the Camera
- Place your camera on a stable surface or a tripod. Ensure it is secure and that the frame includes all the elements you want in your photo. For smartphone users, various accessories can help you position your phone, such as smartphone tripods or mounts.
Final Adjustments and Taking the Photo
- Make any final adjustments to the composition and focus of your photo. If your camera has autofocus, half-press the shutter button to lock in the focus or tap the screen on your smartphone to set the focus point.
- Fully press the shutter button or tap the capture button on the screen to start the timer countdown. Quickly move into position if you’re joining the shot.
- Hold your pose and smile! The camera will take the photo after the set delay has passed.
Tips for Using the Camera Timer
- Stabilizing the Camera: Always use a stable surface or tripod to prevent the camera from moving during the countdown and when the photo is taken.
- Lighting Considerations: Ensure your scene is well-lit, and the subjects are visible. The timer mode doesn’t usually affect the exposure settings, so it’s important to set these correctly before starting the timer.
- Multiple Shots Option: Some cameras and smartphones offer an option to take multiple shots with one timer activation. This can be useful for ensuring you get a photo where everyone is looking at the camera and is ready.
- Remote Control: Consider using a remote control if your camera supports it. This allows you to activate the timer from a distance without needing to rush into position.
Conclusion
Setting up the camera timer is a useful technique that can enhance your photography experience. Whether you’re capturing a group photo, a well-composed selfie, or aiming for a sharp long-exposure shot, utilizing the timer function is an easy way to achieve your desired results. With practice, you’ll find the timer to be an invaluable tool in a wide range of shooting scenarios.
Using the Camera Timer for Group Photos
The timer function is particularly useful for taking group photos where you want to be included in the shot.
Positioning the iPhone
Place your iPhone on a stable surface or a tripod. Make sure it’s secure and that the camera is angled to capture the desired scene. You can use the iPhone’s volume buttons or a compatible remote to start the timer from a distance if you can’t reach the phone.
Joining the Frame
Once the timer is set and the iPhone is in place, tap the shutter button and join the group. The iPhone will flash and/or display a countdown, depending on the model, letting you know when it’s about to take the photo.
Creating Self-Portraits with the Camera Timer
Self-portraiture is a time-honored tradition in the arts, and with modern technology, it’s easier than ever to take a self-portrait with your camera’s timer.
Preparing for the Shot
Before taking the self-portrait, consider the setting, lighting, and composition of your shot.
Choosing a Location and Background
Find a location that suits the mood or theme of your portrait. Consider the background carefully; it should complement, not distract from, the subject – which, in this case, is you. Ensure that the location is safe for your equipment and that your camera or smartphone can be securely positioned.
Lighting Considerations
Good lighting is crucial for any photograph but especially for portraits. Natural light often provides the most flattering illumination. If you’re indoors, position yourself near a window where soft, diffused light can illuminate your face. Avoid harsh, direct light that can cause unflattering shadows.
Setting Up the Camera
Once you have your location and lighting sorted out, it’s time to set up the camera.
Mounting Your Camera or Smartphone
If you have a tripod, mount your camera or smartphone onto it. If not, find a stable surface at an appropriate height to position your device. Ensure that the camera is secure and that there’s no risk of it falling or moving.
Framing the Shot
Frame your shot by imagining where you will be in the scene. Leave enough space to account for your positioning. If your camera has a flip screen, use it to help compose the shot. Otherwise, you might need to take a few test shots and adjust the framing as needed.
Focusing
Most cameras have an autofocus (AF) feature, but for self-portraits using a timer, this can be tricky. If available, use face detection AF to assist in focusing on where your face will be. Alternatively, place an object where you will be standing, focus on that, and switch to manual focus to lock it in.
Using the Timer for Self-Portraits
Now it’s time to use the timer to give you enough time to get in front of the lens.
Activating the Timer
Go to your camera’s timer settings and choose a delay that gives you enough time to press the shutter button and then get into position. This is usually between 2 to 10 seconds, but some cameras offer more time.
Starting the Countdown
Press the shutter button to start the timer countdown, and quickly get into your pre-determined position. Pose as planned, and hold the pose until you hear the shutter click or see the flash indicating that the photo has been to take.
Tips for a Successful Self-Portrait
- Practice Your Pose: Know what pose you want before starting to ensure you’re ready when the camera timer takes the photo.
- Use Burst Mode: If your camera has burst mode, combine it with the timer to take a series of shots in quick succession, increasing the chances of capturing the perfect expression.
- Check Your Shots: After taking the photo, check it to make sure you’re satisfied with the result. If not, adjust and try again.
Advanced Uses of the Timer
The timer feature can be used creatively for more than just group shots and selfies.
Long Exposure and Low Light Photography
For long exposure or low-light photography, using the timer can help reduce camera timer shake. Set the timer, press the shutter button, and let the iPhone remain untouched during the countdown and exposure to minimize any movement.
Conclusion
The camera timer on the iPhone is a simple yet powerful tool that can enhance your photography. Whether you’re taking group photos, selfies, or working with long exposures, the timer allows for greater flexibility and creativity. By following these steps, you can make the most out of this feature and capture great images with your iPhone.