Introduction to Lens Cleaning
Taking care of your camera lenses is crucial for capturing clear, sharp images. Dust, fingerprints, and smudges can degrade image quality. Therefore, using a camera lens cleaning kit is essential for any photographer, whether a hobbyist or a professional.
Regular lens maintenance not only preserves image quality but also extends the lifespan of your gear. It is important to understand that each part of a lens cleaning kit has a specific role in the cleaning process. This section will guide you through the importance of keeping your lenses clean, the basics of the cleaning process, and how to use the tools in a camera lens cleaning kit effectively.
Essential Tools in a Camera Lens Cleaning Kit
Having the right tools in your camera lens cleaning kit can make all the difference in maintaining your photographic equipment. Here’s a breakdown of the essential items every kit should contain:
- Lens Cleaning Brush: A soft-bristled brush helps sweep away loose dust and dirt. Choose one designed specifically for lenses to avoid scratches.
- Microfiber Cloths: These cloths are ideal for removing fingerprints and smudges without leaving lint or scratches behind.
- Lens Cleaning Solution: A specialized cleaning fluid formulated for lens surfaces removes grime without damaging the lens coatings.
- Blower Bulb: This tool directs a stream of air onto the lens to blow away dust particles without physical contact.
- Lens Cleaning Wipes: Pre-moistened wipes offer a convenient, on-the-go option for cleaning lenses quickly.
- Lens Cleaning Tissue: Soft, disposable tissues that are safe for wiping delicate lens surfaces when used with a cleaning solution.
- Lens Cleaning Pen: A pen with a soft tip can remove fingerprints and smudges from lens surfaces delicately and effectively.
When using these tools, it’s crucial to follow the proper cleaning techniques to avoid causing damage to your lenses. Incorporating these essential items into your camera lens cleaning kit will ensure that you’re equipped to keep your camera lenses in pristine condition, allowing you to capture the highest quality images possible.
Step-by-Step Guide to Cleaning Your Lens
Ensuring your lenses stay clear requires a methodical approach. This guide simplifies the lens cleaning process into easy-to-follow steps.
- Inspect the Lens: Always start by inspecting your lens. Look for visible dust, smudges, or other marks.
- Use a Blower Bulb: Gently apply the blower bulb to remove loose dirt. Avoid touching the lens surface.
- Brush Off Dust: Carefully use a lens cleaning brush. Lightly whisk away remaining particles.
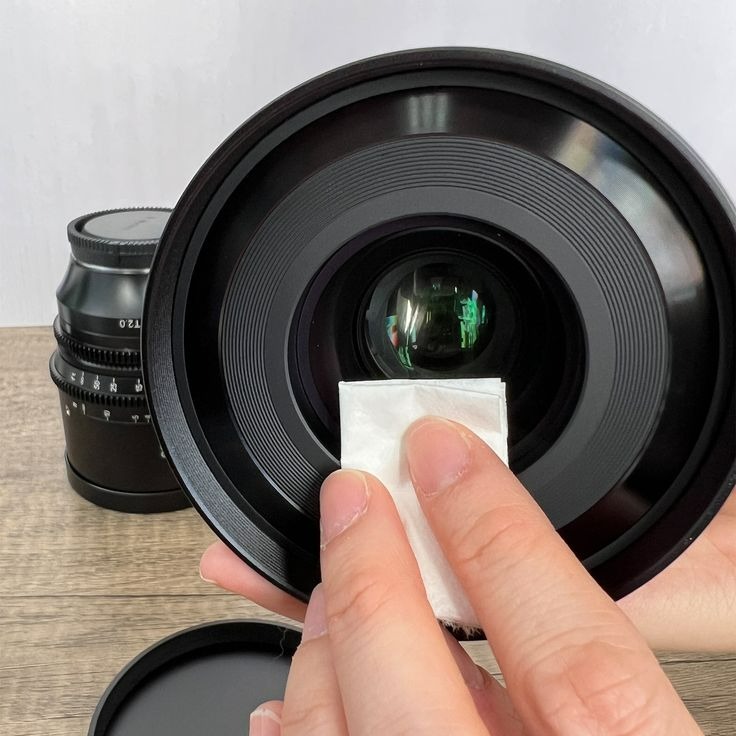
- Apply Lens Cleaning Solution: Dampen a microfiber cloth or lens cleaning tissue with a cleaning solution. Never apply the solution directly onto the lens.
- Wipe Gently: Wipe the lens in a circular motion starting from the center and moving outwards. Take care not to press too hard.
- Dry the Lens: Use a dry section of the microfiber cloth to remove any streaks. Ensure the lens is completely dry.
- Check the Lens: Examine the lens once more. Make sure no streaks or residue remain. If needed, repeat the wiping process with a clean, dry cloth.
- Use Lens Cleaning Wipes for Touch-ups: For quick cleanings, lens cleaning wipes are handy. They’re great for fieldwork when carrying the full kit isn’t possible.
- Re-inspect and Retouch if Necessary: After cleaning, look over the lens again. If you spot any remaining blemishes, gently retouch with a lens cleaning pen.
Make sure the camera lens cleaning kit is ready for the next use. Replace any used tissues or wipes. Store tools neatly to prevent contamination. Regular maintenance following this guide will help keep your lens in excellent condition.
The Do’s and Don’ts of Lens Cleaning
When cleaning your camera lenses, it’s vital to follow certain practices while avoiding others. These do’s and don’ts will help you maintain your lenses without causing damage. Here’s what you need to keep in mind:
- Do Inspect the Lens Before Cleaning: Always evaluate the lens for debris. This informs your cleaning approach.
- Don’t Apply Pressure When Cleaning: Pressing too hard on the lens can cause scratches. Wipe gently.
- Do Use the Right Tools: Tools from the camera lens cleaning kit are designed for this job. Use them.
- Don’t Use Household Cleaners: Chemicals in common cleaners may harm lens coatings. Avoid them.
- Do Clean in a Circular Motion: Start from the center and move outward in a spiral pattern. This technique helps prevent streaking.
- Don’t Clean with Dirty Tools: Ensure brushes and cloths are clean prior to use. Dirt from the tools can transfer to the lens.
- Do Use Lens Cleaning Solution Sparingly: A few drops on a cloth is often enough. Do not drench the cloth.
- Don’t Clean in Dusty Environments: Find a clean place to prevent dust from resettling on the lens.
- Do Keep Your Kit Organized: An orderly kit ensures tools remain clean and ready for their next use.
- Don’t Touch the Lens with Fingers: Oils from your skin can cause smudges. Keep the lens surface free of touch.
Abiding by these guidelines will significantly contribute to the lifespan and functionality of your camera lenses. Your camera lens cleaning kit is a critical ally in this task, so keep it well-stocked and in top condition.
Understanding Lens Cleaning Solutions
Choosing the right lens cleaning solution is key for safe and effective lens maintenance. Different types of solutions may have diverse ingredients, but they share a common goal: to clean without harming the lens coatings. Here’s what you need to know:
- Alcohol-based Solution: It evaporates fast, leaving no streaks. Use it sparingly to avoid lens coatings damage.
- Distilled Water Solution: Sometimes, pure distilled water is enough for basic cleaning. It’s gentle and avoids chemicals.
- Specialized Cleaning Solutions: Opt for solutions made for camera lenses. They’re safe for lens coatings.
- Avoid Household Glass Cleaners: These may contain ammonia or other harmful chemicals. Don’t risk your lens coatings.
When using any cleaning fluid, remember these key points:
- Use Just a Few Drops: Apply a small amount onto a microfiber cloth or tissue.
- Never Apply Directly on the Lens: This might cause the liquid to seep into the lens and damage it.
- Check Expiration Dates: Old solutions can degrade and affect lens coatings.
By understanding lens cleaning solutions, and how to use them properly, you safeguard your camera lens while ensuring it’s ready for your next photo session. Keep these points in mind for routine cleaning and stock your camera lens cleaning kit with a reliable solution.
Tips for Maintaining a Clean Camera Lens
Maintaining a pristine camera lens is crucial for photographers. Here are simple tips to help keep your lens clear:
- Handle Lenses Carefully: Always hold lenses by their edges to avoid smudges.
- Cap Lenses When Not in Use: Protect lenses from dust by capping them immediately after use.
- Keep Camera Bag Clean: Ensure your camera bag is free of dirt and debris to prevent lens contamination.
- Avoid Excessive Cleaning: Cleaning too often can wear down the lens coatings over time.
- Use Lens Capsule: Consider a lens capsule for extra protection against humidity and dust.
- Check Air Quality: Clean your lens less often in clean environments; more often in dirty or sandy conditions.
By consistently practicing these tips, your camera lenses will stay cleaner for longer. This will reduce the frequency of deep cleanings needed, increasing the longevity of your equipment. Always keep your camera lens cleaning kit accessible for quick touch-ups and remember to replenish consumables like wipes and tissues as needed.
When to Seek Professional Lens Cleaning Services
While a good camera lens cleaning kit and proper technique can handle most cleaning tasks, there are times when professional services are necessary. Here’s how you know when to seek expert help:
- Stubborn Residue: If you can’t remove a blemish or sticky substance with your cleaning kit, it’s time for professional service.
- Internal Dust or Moisture: If you notice dust particles or condensation inside the lens that you cannot clean, professionals need to disassemble the lens.
- Lens Calibration Needs: Professional cleaning services often include calibration checks to ensure optimal performance.
- After an Accident: If your lens has been dropped or exposed to harsh elements, a professional can assess any potential damage.
- Regular Maintenance: For high-use lenses, an occasional professional clean can maintain top condition.
- Before Selling: To increase resale value, have a professional clean your lens thoroughly.
Professional cleaning services have the right equipment and expertise to handle complex issues without risking damage to your lenses. When in doubt, opt for expert care to preserve the quality and longevity of your camera equipment.
Storing Your Lens Cleaning Kit Properly
Maintaining an organized camera lens cleaning kit is critical for effective lens care. Here are optimal storage tips:
- Use a Protective Case: Choose a sturdy, padded case that keeps tools secure and prevents damage.
- Separate Compartments: To avoid cross-contamination, store tools in individual compartments.
- Keep It Dry: Store the kit in a dry place to avoid moisture buildup, which can harm lens cleaning tools.
- Avoid Extreme Temperatures: Do not leave the kit in hot or cold extremes, as this could damage the cleaning fluids.
- Stay Clean: Regularly clean the case and replace any dirty microfiber cloths or used tissues.
- Replenish Supplies: Check and restock items like tissues and cleaning solution periodically.
By following these storage tips, your camera lens cleaning kit will always be ready for use. A well-preserved kit ensures longevity of both the kit and your camera lenses. This concludes our conversation on camera lens cleaning kit essentials.