Introduction to Crafting a Pinhole Camera
A pinhole camera, also known as a camera obscura, is one of the simplest forms of a camera. It’s a light-proof box with a tiny hole in one side that allows light to enter and form an image on the opposite side of the box. Building a pinhole camera is an engaging project that combines art, science, and photography. This guide will take you through the steps to create your own pinhole camera from scratch.
Understanding the Science Behind the Pinhole Camera
The principle behind the pinhole camera is based on the physics of light. Light travels in straight lines, and when it passes through a small aperture, like the pinhole in the camera, it projects an inverted image on the surface opposite the hole. The smaller the hole, the sharper the image, but also the dimmer it will be because less light can get through.
Materials Needed for a DIY Pinhole Camera
To construct a pinhole camera, you will need the following materials:
- A square or rectangular tin or cardboard box
- Black paint (if using a cardboard box)
- Thick black paper or tape to make the box lightproof
- Aluminum foil
- A pin or needle for making the hole
- Photographic paper or film
- Sandpaper (fine-grain)
- A craft knife or scissors
- A ruler and a pencil
Preparing the Camera Body
Select a box that’s both easy to seal and the right size for your project. If using a cardboard box, paint the inside black to prevent light reflections. The box should be as lightproof as possible, so cover any seams or potential light leaks with thick black paper or tape. Seal the box well because even the smallest light leak can ruin the photographic paper or film.
Creating the Pinhole Aperture
The aperture is what allows light to enter the camera and needs to be precisely made to produce a clear image:
- Cutting the Aperture: Cut a square hole (about 1 inch by 1 inch) in the center of one side of the box, which will be the front of the camera.
- Preparing the Pinhole: Cut a piece of aluminum foil slightly larger than the square hole and carefully make a pinhole in its center using a pin or needle. The hole should be clean and round.
- Mounting the Pinhole: Fasten the aluminum foil over the square hole on the inside of the box, ensuring it’s completely flat and secure.
Loading the Photographic Paper or Film
In a completely dark room or a lightproof bag, place the photographic paper or film inside the camera on the side opposite the pinhole. The emulsion side of the paper or film should face the pinhole. Secure it in place so it does not move, but be careful not to crease or damage it.
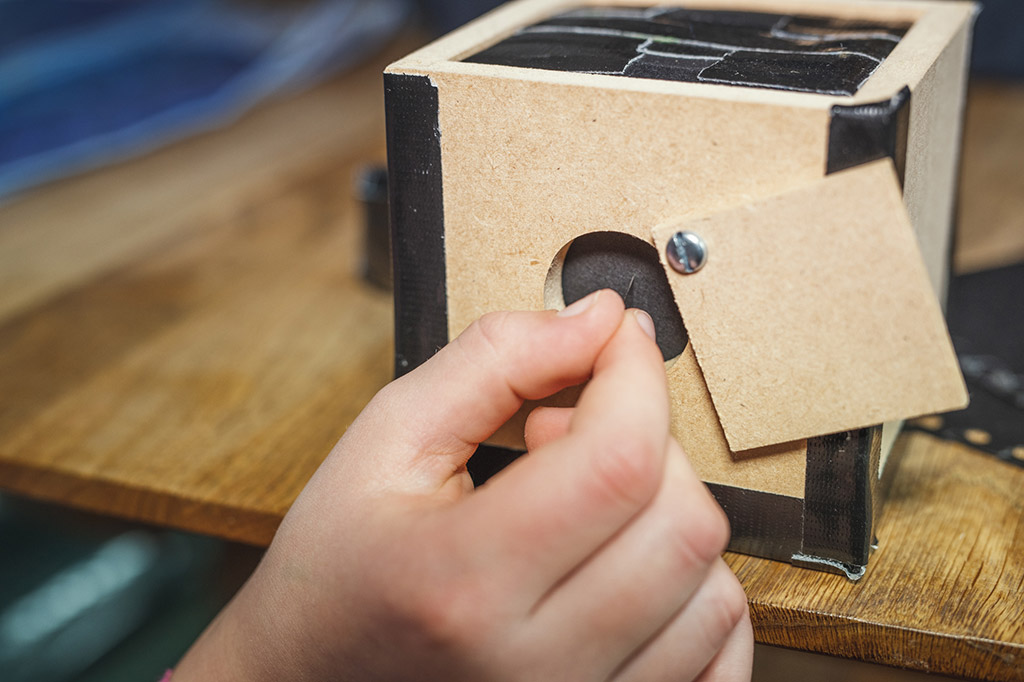
Sealing the Camera and Controlling Exposure
Once the photographic paper or film is loaded, seal the camera completely. To control the exposure:
- Create a Shutter: Use a piece of opaque tape or thick black paper larger than the pinhole as a shutter. Attach it to the camera in a way that it can cover and uncover the pinhole without letting in additional light.
- Exposure Length: Determine the length of the exposure, which can vary depending on the brightness of the scene and the size of the pinhole. Exposures can range from a few seconds to several minutes.
Composing Your Shot
Pinhole cameras lack the viewfinders of modern cameras, so composing a shot requires estimation:
- Estimating the Field of View: Experiment with the camera to get a feel for its field of view. Generally, the wider the box, the larger the field of view.
- Positioning the Camera: Place the camera on a stable surface or use a tripod if it has fittings. Aim it towards the scene you wish to capture.
Capturing the Image
To take a photo with your pinhole camera:
- Prepare for Exposure: Set up the camera in front of the scene you want to photograph.
- Open the Shutter: Remove the shutter covering the pinhole to start the exposure. Be as still as possible to avoid camera shake.
- Close the Shutter: After the desired exposure time has passed, cover the pinhole again with the shutter.
Developing the Image
Darkroom processing is necessary if you’ve used photographic paper or film:
- Developing the Paper or Film: In a darkroom, use the appropriate chemicals to develop the photographic paper or film according to the instructions for your materials.
- Fixing the Image: After the image appears, use a fixer solution to stop the development process and make the image permanent.
- Washing and Drying: Wash the paper or film to remove any remaining chemicals, then allow it to dry completely.
Troubleshooting Common Pinhole Camera Issues
If the images are not turning out as expected, consider these common issues:
- Unclear Images: If the images are blurry or unclear, ensure that the pinhole is round and free from burrs. Also, check for camera stability during exposure.
- Overexposure or Underexposure: Experiment with exposure times, taking notes of the results to refine your technique.
- Light Leaks: Inspect the camera for any areas where light might be entering and reseal them.
Experimenting with Pinhole Photography
Once you’ve mastered the basics, experiment with different box sizes, pinhole sizes, and exposure times. You can also try using color photographic paper or film for different effects.
Conclusion
Building and using a pinhole camera is an enriching experience that teaches the fundamentals of photography. It allows you to slow down and appreciate the creative process, resulting in unique and often unexpected images. With practice, you can refine your technique and produce captivating photographs that reflect the distinctive charm of pinhole photography.