Introduction to Blender’s Camera System
Blender, the open-source 3D creation suite, offers a comprehensive camera system that simulates the functionalities of a real-world camera. Learning to control the camera view in Blender is essential for creating compelling 3D art, animations, and visualizations.
Understanding Blender’s Camera
The camera in Blender acts as the viewer’s eye into the 3D scene. It determines what will be rendered in the final output. It defines the perspective, composition, and framing of the scene, just like a physical camera does in photography or cinematography.
The Importance of Camera Setup
Setting up the camera correctly is crucial for conveying the intended mood, focus, and narrative of your 3D work. A well-composed camera view can enhance the storytelling and visual impact of your renders, making them more engaging and professional.
Accessing the Camera View
To enter Camera View in Blender, you simply press the Numpad 0 key. This switches your viewpoint to see exactly what your camera sees. If you have multiple cameras, you can select which one to view through the Scene Properties panel.
Positioning the Camera
Moving and positioning the camera in Blender is similar to moving any other object. You can use the G key to grab and move the camera, the R key to rotate it, and the S key to scale the camera’s size, although scaling does not affect the camera’s perspective.

Camera View Options and Features
Adjusting Camera Settings
Blender’s camera settings allow for a high level of customization. You can adjust the focal length, depth of field, and sensor size, among other parameters, in the Camera Properties panel. These settings mimic real camera specifications, giving you control over the look and feel of your shot.
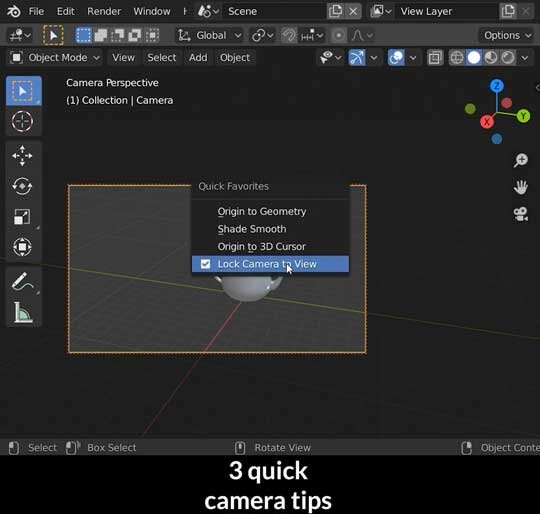
Using the Lock Camera to View Feature
When fine-tuning your camera angle, ‘Lock Camera to View’ is an invaluable feature. Found in the View panel of the Sidebar (N key), this option locks the camera to your viewport movements. You can navigate as you typically would in the 3D view, and the camera will follow along, updating its position and rotation in real-time.
Advanced Camera Techniques
Advanced Camera Techniques in Blender
Creating and Using Camera Rigs
Building Custom Camera Rigs
Camera rigs are advanced setups that allow for complex camera movements and control. In Blender, you can build custom camera rigs by parenting your camera to other objects or armatures, which then serve as the “rig.” These rigs can include empty objects that act as targets for the camera to follow or track, creating smooth pans, tilts, and dolly movements.
Utilizing Constraints for Dynamic Shots
Using Blender’s constraint system, you can attach your camera to paths or other objects within your scene. Constraints like ‘Track To’ or ‘Follow Path’ enable your camera to maintain focus on a subject or follow a predetermined path with ease. This is particularly useful for scenes requiring a steady cam effect or intricate flight paths.
Animating Camera Movements
Keyframing Camera Transforms
To animate your camera, you can insert keyframes for its location, rotation, and even parameters like focal length or depth of field. By setting these keyframes at different points along the timeline, you create the basis for your camera’s animation. Blender’s Dope Sheet and Graph Editor then allow you to refine the timing and interpolation of these keyframes, offering precise control over the camera’s motion.
Using Motion Blur for Realism
Motion blur adds realism to your animated shots by simulating the natural blur that occurs when objects move rapidly. In Blender, you can enable motion blur in the render settings, adjusting the shutter speed to control the amount of blur. This effect can help convey the speed and fluidity of camera movements or fast-moving subjects within your scene.
Depth of Field and Focus Techniques
Controlling Depth of Field
Depth of field (DoF) is the range of distance within a scene that appears acceptably sharp. By adjusting the DoF settings in the camera properties, you can create a shallow depth of field, drawing attention to specific parts of your scene while blurring out the rest. This is a powerful compositional tool that can highlight your focal point and add depth to your renders.
Automating Focus Pulls
A focus pull is a technique used in cinematography to shift the focus from one subject to another smoothly. In Blender, you can animate the focus distance of the camera to simulate this effect. By keyframing the focus distance property, you can transition the sharpness between different objects within your scene, adding a professional touch to your camera work.
Conclusion
Mastering the camera view in Blender is an essential skill for any 3D artist. It allows you to direct the viewer’s attention, craft compelling narratives, and produce professional-level visuals. Through the understanding and manipulation of camera settings and movements, you can elevate the quality of your 3D projects and bring your virtual worlds to life.