Importance of Keeping Your Camera Lens Clean
A clean camera lens is crucial for photographers. It ensures the highest image quality and prevents damage. Even the smallest speck of dust can spoil a perfect shot. Over time, dust and smudges can lead to scratches. These scratches ruin the lens’s clarity. They can even become permanent, affecting your photography significantly.
Regular cleaning maintains lens performance. It saves you money on costly repairs or replacements. It also extends the lens’s life. This preservation is essential for photographers who see their equipment as investments.
Moreover, a dirty lens can harbor fungi. These growths can cause irreparable harm to the lens elements. Practicing regular cleaning keeps these threats at bay. It helps in capturing sharp, clear images consistently. Also, when you take care of your gear, it shows professionalism. Clients trust photographers who maintain their equipment well. It reflects their dedication to their craft.
Remember, a speckless lens can make a world of difference in your photography. Aim to incorporate lens cleaning into your regular maintenance routine. It will ensure the longevity and performance of your camera gear. Thus, maximizing your potential for capturing stunning photographs.
Tools You Need for Cleaning Your Camera Lens
Cleaning your camera lens properly requires the right tools. Proper tools ensure a safe and effective clean. You want to avoid scratching the surface of your lens. For a thorough cleaning job, here are the essentials you’ll need:
- Lens Cleaning Solution: Choose a solution made specifically for camera lenses.
- Microfiber Cloth: This cloth removes dust, smudges, and oils without leaving scratches.
- Lens Brush: A soft-bristled brush gently sweeps away particles.
- Air Blower: Use this to blow away loose dust before wiping the lens.
- Lens Tissue: Disposable and ideal for a quick clean-up.
- Cleaning Swabs: Specially designed swabs for cleaning the edges and tight spots.
When gathering your cleaning supplies, remember to pick high-quality products. Cheap materials can harm your lens. Always keep your tools clean and in good condition. Dirty or damaged tools can cause more harm than help. With the right set, you will maintain the sharpness and clarity of your photos. They will also help in extending the lifespan of your camera lens.
Before you start the cleaning process, set up a clean workspace. Make sure there is no dust around that could re-contaminate your lens. Be gentle during the whole process to avoid any damage. Start by using the air blower, followed by the brush and then the cloth and solution. Cleaning your camera lens is a simple task that goes a long way in keeping your photography at its best.
Step-by-Step Guide to Cleaning Your Camera Lens
Cleaning your camera lens does not have to be a daunting task. By following these simple steps, you can ensure your lens remains in pristine condition, ready for your next photo session:
- Prepare Your Workspace: Find a clean, dust-free area. Lay all tools out within easy reach.
- Start with the Air Blower: Use the blower to remove any loose dust. Keep the lens facing downwards so dust falls away.
- Use the Lens Brush: Gently brush the lens surface. Start from the center and move to the edges in a circular motion.
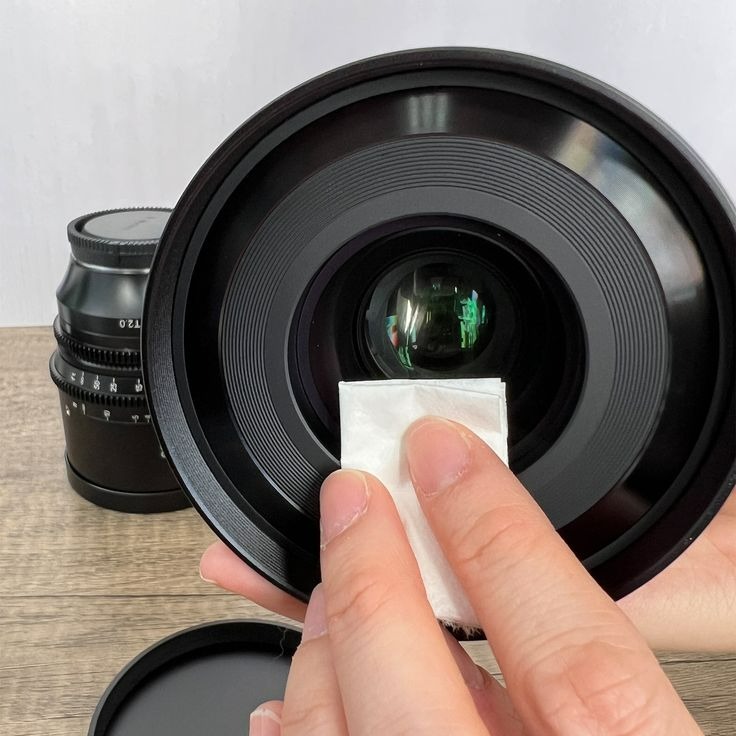
- Wipe with a Microfiber Cloth: Lightly dampen the cloth with lens cleaning solution. Use gentle, circular strokes to clean the lens.
- Employ Lens Tissue for Touch-ups: Address any remaining spots with lens tissue. Avoid applying too much pressure.
- Finalize with Cleaning Swabs: Carefully clean the edges and tight spots. Do not reuse swabs to avoid transferring dirt.
Remember, be gentle at every step. Using too much force can scratch the lens. Also, hold your tools by the edges to keep them clean. Make sure the lens cleaning solution does not leak into the lens elements. After every step, inspect the lens for any remaining dirt or smudges. If dirt persists, repeat the necessary steps with care. These simple practices in cleaning your camera lens will ensure you continue to take sharp photos for a long time.
Common Mistakes to Avoid When Cleaning Camera Lenses
Cleaning camera lenses seems straightforward, but common errors can lead to damage. To maintain your lens’s quality, avoid these mistakes:
- Using Rough Materials: Don’t use tissues or shirts for cleaning. They may scratch the lens. Always opt for a soft microfiber cloth.
- Cleaning in Circular Motion Right Away: Begin with straight strokes. Switch to a circular motion gradually to avoid smearing debris.
- Applying Excessive Pressure: When wiping or using swabs, be gentle. Too much force can cause scratches.
- Spraying Solution Directly on the Lens: Spray the cleaning solution onto the cloth, not the lens. Direct application can allow liquid to seep inside and damage the lens’s internal parts.
- Not Using a Blower First: Always remove loose dust with an air blower before wiping. This prevents dust particles from scratching the lens during cleaning.
- Ignoring the Lens Edges: Dirt accumulates on the edges. Clean them carefully with specialized swabs.
- Reusing Dirty Cloth or Tissue: Always use a fresh cloth or lens tissue. Reusing can transfer old dirt back onto the lens.
By avoiding these pitfalls, you’ll keep your lens in peak condition. Remember, gentle and thorough cleaning is key to prolonging its life and functionality.
How to Handle Stubborn Dirt and Smudges
Sometimes, despite careful cleaning, tough dirt or smudges may remain. If you face stubborn grime on your lens, follow these tips:
- Reapply Lens Cleaning Solution: Dampen a microfiber cloth with more solution. Gently work on the stubborn areas.
- Use a Lens Pen: The soft, carbon-covered tip can remove fingerprints and smudges without damaging the lens.
- Utilize Specialized Cleaning Fluids: Some fluids dissolve oily residue better. Apply them sparingly to your microfiber cloth.
- Be Patient with the Process: If dirt persists, give it time. Repeat the cleaning steps gently without applying extra pressure.
- Consider a Professional Cleaner: When smudges won’t budge, a professional cleaning service may be necessary.
Do not resort to using saliva or breath. They may seem effective, but they can leave harmful residue. And remember, never touch the lens with your fingers. Oils from your skin can create new smudges, making cleaning more difficult. Stick to the proper tools and procedures for cleaning your camera lens to ensure persistent dirt and smudges do not stand in the way of crystal-clear photographs.
Cleaning Camera Lens Filters
Just like the lens itself, camera lens filters need regular cleaning to perform their best. Filters protect your lens from dust, smudges, and scratches. But, they also get dirty. A clean filter ensures that it can do its job and not add unwanted artifacts to your photos.
Here’s how to keep your lens filters clean:
- Remove the Filter: Carefully unscrew the filter from the lens.
- Blow Away Dust: Use an air blower to gently remove any loose dust from the filter.
- Rinse with Water: If the filter manufacturer says it’s safe, lightly rinse the filter under running water.
- Apply Cleaning Solution: Drip a few drops of lens cleaning solution onto a microfiber cloth, not directly onto the filter.
- Wipe Gently: Clean the filter with the cloth in a gentle, circular motion.
- Dry the Filter: Use a fresh, dry microfiber cloth to remove any moisture.
- Reattach the Filter: Once fully dry, screw the clean filter back onto your lens.
Make sure you handle the filters with care. Avoid using tap water as it may leave mineral deposits on the filter surface. Also, never use rough materials; they can cause scratches. Keep your filters stored properly when not in use to prevent accumulation of dirt. Regular maintenance of your lens filters is as critical as cleaning the lenses themselves. It is a simple step towards maintaining the quality of your photos.
Storing Your Camera Lens to Prevent Dirt Accumulation
Proper lens storage is key to minimizing the need for frequent cleaning. Here are some tips to keep your lenses dust-free while they’re not in use:
- Use Lens Caps: Always place the front and rear lens caps on before storage. They shield the lens elements from dust and contact.
- Keep in a Dry Environment: Store your lenses in a low-humidity area to prevent fungus growth.
- Use Silica Gel Packs: Place these in your storage area to absorb moisture.
- Use Padded Lens Cases: A padded case protects your lenses from impact and keeps dust out.
- Avoid Rapid Temperature Changes: Sudden changes can cause condensation. Store your gear in a place with steady temperature.
- Clean Lenses Before Storage: Ensure your lenses are clean before storing them. This prevents existing dust from sticking.
- Check Your Gear Regularly: Even in storage, inspect lenses periodically for dust or fungus.
By following these storage practices, you can significantly reduce the risk of dirt accumulation. This in turn helps preserve your camera lens’s clarity and extends its functional life. Regular and proper storage is just as important as the cleaning process itself for ensuring continual shooting of sharp images with your equipment.
Professional Cleaning Services: When to Consider Them
Even with regular maintenance, sometimes a camera lens may require professional cleaning services. Here are situations when it’s wise to consider them:
- After Exposure to Harsh Environments: If your lens has been in salty sea air, sandy deserts, or other harsh conditions, professional cleaning can ensure thorough removal of corrosive or abrasive particles.
- When Fungus is Detected: Fungus can spread quickly and damage the internal elements of your lens. Professionals have the tools and solutions to eradicate it without harming your lens.
- Before a Major Event or Project: If you’re preparing for a significant shoot, professional cleaning can give you peace of mind. Your equipment will be in top condition for capturing the best images.
- If You Notice Internal Dust or Debris: When dust gets inside your lens, it’s challenging to remove without specialized equipment. Professionals can disassemble your lens safely and clean it inside and out.
- After Accidental Liquid Contact: In case of contact with water or other liquids, a quick professional service can prevent permanent damage by cleaning and drying your lens properly.
- If You’ve Inherited or Bought Used Gear: Second-hand lenses might have hidden issues. A professional clean will ensure that your new-to-you gear functions flawlessly.
In these instances, professionals use meticulous procedures that go beyond basic cleaning. They help maintain the integrity and longevity of your camera lens. Always check reviews and choose a reputable service center. By doing so, you’ll ensure that your valued photography gear is in safe hands.